 English
 日本語
日本語 русский
 Español


Customer expresses intent; Communicate between the two parties; Provide analysis reports to customers; Reach a cooperation intention.
Content
- 1 The Most Common Carport Problems Homeowners Face
- 2 Roof Leaks and Water Damage
- 3 Rust and Corrosion on Metal Carport Frames
- 4 Foundation and Footing Problems
- 5 Poor Drainage and Water Pooling
- 6 Damaged or Deteriorated Support Posts
- 7 Wind Damage and Structural Racking
- 8 Wood Rot and Insect Damage in Timber Carports
- 9 Paint and Surface Coating Failure
- 10 Inadequate Lighting and Electrical Problems
- 11 Planning, Permit, and Boundary Compliance Problems
- 12 Maintenance Schedule to Prevent Carport Problems
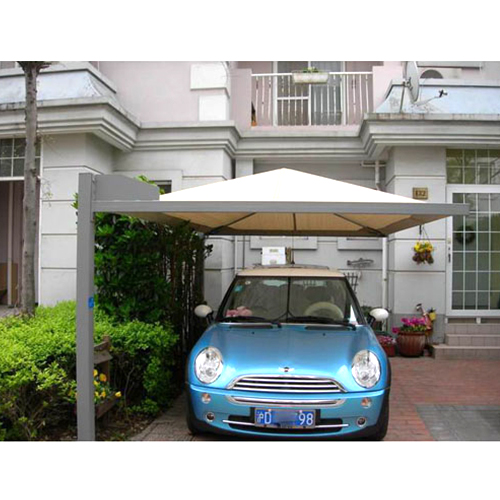
The Most Common Carport Problems Homeowners Face
The short answer: the most common carport problems include roof leaks, structural corrosion, foundation shifting, poor drainage, and damaged support posts. These issues affect both metal and wood carports and, if left unaddressed, can escalate from minor inconveniences into costly structural failures. A carport that was installed correctly and maintained regularly can last 20 to 40 years, but one that is neglected often shows serious deterioration within 5 to 10 years.
Understanding what goes wrong — and why — is the first step toward keeping your carport functional, safe, and looking good for the long haul. Below is a thorough breakdown of every major problem category, what causes it, how to spot it early, and what to do about it.
Roof Leaks and Water Damage
Roof leaks rank as the number one complaint among carport owners. A leaking carport roof doesn't just get your vehicle wet — it accelerates corrosion on metal components, rots timber framing, and can eventually compromise the entire structure. The causes vary depending on the roofing material used.
Why Carport Roofs Leak
For metal carports with corrugated or ribbed sheeting, leaks typically develop at the overlap seams, around fastener holes, or at the ridge cap. Over time, the rubber washers on self-drilling screws harden and crack, allowing water to track down the screw shaft and drip onto whatever is below. A carport with 200 screws — a fairly standard count for a mid-sized structure — has 200 potential water entry points.
For polycarbonate or acrylic roofing panels, the problem is often UV degradation. These materials are initially rated for 10 to 15 years of UV exposure, but in high-sun climates like Queensland or Arizona, discoloration and micro-cracking can begin within 5 years. Once the surface cracks, water channels through even tiny fissures.
Wood-framed carports with sarking, tiles, or roofing felt can develop leaks at flashing points, around any penetrations (such as downpipe connections), and wherever the roofing membrane has lifted or split.
Signs of Roof Leak Damage
- Rust stains running down interior posts or wall cladding
- Standing water on the carport floor after rain
- Soft or spongy timber rafters when pressed
- Visible light coming through roofing panels at night
- Water marks or mineral deposits (efflorescence) on the concrete slab below
Fixing Roof Leaks
For screw-based leaks on metal carport roofs, the fix is straightforward: replace degraded fasteners with new ones fitted with fresh neoprene washers, and apply a compatible roofing sealant around each penetration point. Budget roughly $150 to $400 for a full re-fastening job on an average single-car carport. If the panels themselves are corroded or cracked, replacement is more cost-effective than patching in most cases. Polycarbonate sheets typically cost $20 to $60 per panel depending on thickness and UV rating.
Rust and Corrosion on Metal Carport Frames
Metal carports are popular for good reason: they're affordable, quick to install, and low-maintenance compared to timber. But corrosion is their single biggest long-term weakness. Even galvanized steel will eventually rust when the zinc coating is breached by impact, abrasion, or simply the passage of time.
Where Rust Typically Starts
Rust on a carport frame rarely starts in a random location. It almost always begins at one of these points:
- Post bases: where the steel contacts soil, concrete, or trapped moisture. This zone stays wet longer than any other part of the frame.
- Cut or drilled edges: any edge that was cut during installation exposes raw steel not covered by the zinc coating.
- Fastener points: dissimilar metals in contact (for example, a stainless screw in zinc-coated steel) create a galvanic cell that accelerates corrosion.
- Scratches and dents: even a minor scrape from a car door or lawn equipment can strip the protective coating and expose bare metal.
In coastal or high-humidity areas, the corrosion timeline compresses significantly. A carport within one kilometre of the ocean in a salt-air environment can show measurable rust within 2 to 3 years without treatment, even on galvanized frames.
Treating and Preventing Carport Corrosion
Surface rust — rust that has not yet compromised the structural thickness of the steel — can be treated with a wire brush or angle grinder to remove loose scale, followed by a rust converter product, and then a zinc-rich primer and topcoat. For post bases that are embedded in or adjacent to concrete, ensuring adequate drainage so the base dries quickly after rain is as important as any surface treatment.
Deep pitting or section loss (where the rust has eaten through more than 20% of the wall thickness) typically requires section replacement rather than surface treatment. At that stage, the structural integrity of the post or beam is compromised and no amount of paint will restore it.
| Rust Level | Appearance | Recommended Action | Estimated Cost |
|---|---|---|---|
| Surface staining | Light orange discolouration, no flaking | Clean, prime, and repaint | $30–$80 DIY |
| Moderate rust | Flaking paint, visible pitting | Wire brush, rust converter, zinc primer, topcoat | $80–$200 DIY |
| Deep pitting | Holes forming, metal feels soft | Replace affected section | $200–$600+ professional |
| Structural failure | Post or beam has lost significant cross-section | Full structure replacement | $2,000–$8,000+ |
Foundation and Footing Problems
A carport is only as solid as what it sits on. Foundation problems are among the most serious carport issues because they affect the stability of the entire structure. They are also among the most commonly overlooked, since the damage usually develops slowly and underground.
Slab Cracking and Heaving
Concrete slabs crack for several reasons: soil movement (particularly in clay-heavy soils that expand when wet and contract when dry), tree root intrusion, poor initial compaction of the sub-base, or inadequate slab thickness. A carport slab should typically be at least 100mm (4 inches) thick for light vehicle use, with reinforcement mesh. Slabs poured without mesh or on poorly prepared ground are more prone to cracking within 5 to 10 years.
Hairline cracks up to 1mm wide are generally cosmetic and can be sealed with a flexible polyurethane crack filler. Cracks wider than 3mm, or cracks where one side is higher than the other (step cracking), suggest differential settlement and warrant professional assessment.
Post Footings That Have Shifted
For freestanding carports attached to concrete footings (piers), shifting occurs when the footing is too shallow, the soil is expansive, or water accumulates and freezes in cold climates. When a footing shifts, the post attached to it leans or twists, throwing the roof structure out of alignment. A post that is more than 10mm out of plumb is a structural concern that should not be ignored.
In some cases, the footing can be stabilized using expanding grout or polyurethane foam injected beneath it — a process called slab lifting or mudjacking. In severe cases, the post must be removed, the footing excavated and replaced to the correct depth (typically 300mm to 600mm below the frost line or below the zone of soil movement), and the post reinstalled.
Carport Slabs Attached to House Footings
When a carport slab was poured monolithically against a house slab or attached to the house footing, differential movement between the two structures can create a gap or step at the junction. This junction is also a common water entry point. An expansion joint filler or flexible sealant maintained at this junction prevents both water ingress and slab edge chipping.

Poor Drainage and Water Pooling
Drainage problems affect a surprisingly high proportion of carports, including many that were professionally installed. The issue usually comes down to slope — or the lack of it.
Roof Drainage Issues
A carport roof should have a minimum pitch of 1 degree (about 17mm of fall per metre of run) for metal sheeting and at least 5 degrees for tiles or flat roofing products. Roofs installed below these minimums will pond water in low spots, which accelerates corrosion at seams and causes fasteners to stay wet far longer than they were designed to.
Where gutters are fitted, blocked gutters are a regular maintenance issue. A carport positioned near trees can have its gutters completely clogged within a single autumn season. Overflowing gutters shed water directly against posts, leading to concentrated corrosion at the base. Cleaning carport gutters at least twice a year — or fitting gutter guard mesh — is one of the simplest preventive measures available.
Ground-Level Water Pooling
A carport slab should be graded away from the house and toward the street or a stormwater drain, with a cross-fall of at least 1:100 (10mm per metre). Slabs poured level — or that have settled to create a bowl shape — retain water after rain. Pooled water under vehicles creates a persistently humid microclimate that promotes underbody rust on cars and keeps the post bases wet continuously.
Correcting slab drainage without full replacement can be done using a concrete grinding service to re-establish the correct fall, or by applying a polymer-modified topping screed, which can be feathered out to achieve a new slope across the slab. Either approach costs significantly less than slab replacement and typically runs $500 to $2,000 depending on area size and severity.
Damaged or Deteriorated Support Posts
Support posts are the vertical load-bearing elements that transfer the weight of the roof — and any snow, debris, or equipment stored on it — down to the foundation. Damage to even one post affects the load distribution across the whole carport structure.
Impact Damage
This is more common than most homeowners admit. A minor collision with a post while reversing — even one that leaves no visible dent — can buckle the steel internally or crack the weld at the base plate. A post that has been struck should be inspected for plumb (checked with a spirit level or plumb bob) and for any deformation at the point of impact. A post that has been buckled by more than 5mm from its original axis should be replaced before it fails under load.
Timber Post Rot
Timber carport posts are vulnerable to rot at the base, particularly where the post sits in or very close to soil or damp concrete. Even treated timber (H3 or H4 rated) will eventually succumb to fungal decay if the moisture conditions are right. Rot typically progresses from the outside inward, so a post that looks sound externally may have a hollow core. Probing with a sharp awl or screwdriver will reveal soft internal decay that isn't visible on the surface.
Partially rotted posts can sometimes be repaired with two-part epoxy consolidant and filler systems, but once more than one-third of the cross-section is compromised, replacement is the only reliable solution. When replacing timber posts, installing a metal standoff base fitting keeps the new timber 50mm above the slab surface and dramatically extends its service life.
Loose Base Plates and Anchor Bolts
Steel carport posts are typically secured to concrete with base plates and anchor bolts. Over time, the concrete around anchor bolts can crack or crumble, particularly if the bolts were under-embedded originally (minimum embedment is typically 75mm to 100mm) or if the concrete quality was poor. A post that rocks or shifts when pushed by hand has a failed base connection and should be regrouted or re-anchored immediately.
Wind Damage and Structural Racking
Carports have a large surface area relative to their weight, which makes them particularly susceptible to wind. Racking — the lateral distortion of a rectangular frame into a parallelogram shape — is the most common wind-related structural problem for carports that are not adequately braced.
Signs of Wind-Induced Racking
- Posts that lean in the same direction as prevailing winds
- Roof sheets that have lifted or curled at the edges
- Fasteners that have pulled through the roofing material (often seen as elongated holes rather than round ones)
- Connections between rafters and wall plates that have opened up or separated
- Visible gaps between the carport frame and an attached wall where it was previously flush
Many budget metal carport kits are sold without adequate diagonal bracing. In cyclone or high-wind zones (designated W50 or C regions in Australia, or Wind Exposure Categories C and D in the US), additional knee braces, diagonal rod bracing, or knee wall panels are not optional — they are a structural requirement. A carport that was not designed to the local wind rating for its location is a liability in every storm.
Roof Sheet Uplift
Wind creates negative pressure (suction) on the underside of a carport roof as it passes over the top. This is the same aerodynamic effect that creates lift on an aircraft wing. For a standard single-car carport with a roof area of around 20 square metres, a 100km/h wind can generate uplift forces exceeding 2,000 newtons across the whole roof — enough to strip it from an inadequately fastened frame. Using the correct number of fasteners at the correct spacing (typically specified in the carport's engineering documentation) is essential, not optional.
Wood Rot and Insect Damage in Timber Carports
Timber carports offer a warmer aesthetic than metal structures and are often preferred for period homes or in heritage overlays. However, they require more active maintenance to prevent biological degradation — both fungal and insect-based.
Fungal Decay
Wood rot fungi require four conditions simultaneously: oxygen, warmth, moisture, and a food source (wood). Eliminating moisture is the only practical control. This means ensuring all horizontal timber surfaces shed water (which requires adequate slope or a drip edge profile), that end grain is sealed with appropriate primer or timber end-grain sealer, and that any timber-to-masonry connections have a damp-proof course or isolating membrane.
Rafters are particularly vulnerable where they contact or rest on masonry walls, as the masonry wicks moisture from the ground and keeps the timber-masonry interface perpetually damp. Inserting a DPC (damp proof course) membrane at this junction is a simple fix that significantly extends rafter life.
Termite and Borer Damage
In termite-active areas — which includes large portions of Australia, the southern United States, and parts of Asia — a timber carport that is not properly protected with a chemical barrier or physical termite management system is extremely vulnerable. Termites can hollow out a full 90×45mm structural bearer in a matter of months without any visible external signs. Tapping timber members with a hard object and listening for a hollow sound is one diagnostic method; professional thermal imaging and moisture meter checks are more reliable.
Borer beetles (such as the common furniture beetle or Queensland pine beetle) leave small round exit holes — typically 1mm to 3mm in diameter — in the timber surface. Active infestations can be treated with permethrin-based insecticidal treatments applied by brush or spray, but heavily infested structural timbers should be replaced.
Paint and Surface Coating Failure
The protective coating on a carport — whether powder coat on steel, paint on timber, or an anodised finish on aluminium — is the first line of defense against the elements. When this coating fails, the underlying material degrades at a much faster rate.
Powder Coat Failure on Steel Carports
Powder coat is baked onto the steel surface at the factory and provides excellent protection when intact. Common failure modes include UV chalking (where the pigment breaks down and the surface becomes dull and powdery), edge chipping (where the coating pulls away from cut edges that were not properly finished before coating), and blistering (which indicates moisture has penetrated beneath the coat, often at a scratch or chip).
Powder coat typically carries a warranty of 10 to 15 years from reputable carport manufacturers, but this assumes the carport is washed down several times a year to remove salt, dust, and biological matter. A carport that is never cleaned will see its powder coat fail significantly sooner than one that is washed every few months with a mild detergent solution.
Paint Peeling on Timber Carports
Paint peels from timber for two main reasons: moisture behind the film, or inadequate surface preparation before painting. If moisture gets behind the paint — through a crack, unsealed end grain, or a capillary gap at a joint — the vapour pressure from the moisture as the timber dries will push the paint off from behind. No topcoat, however high quality, can resist this from the outside.
Repainting a timber carport requires full preparation: all loose paint scraped and sanded back to a sound edge, bare timber primed with a penetrating oil-based primer, all gaps and cracks caulked with a paintable flexible sealant, and then two topcoats applied. Skipping the primer or caulking step virtually guarantees early failure of the new paint.
Inadequate Lighting and Electrical Problems
Many carports include electrical fittings — security lights, power outlets, or EV charging points. Electrical problems in carports are both a safety risk and a practical inconvenience.
Common Electrical Issues
- Fittings rated for indoor use only: standard domestic light fittings installed in a carport without weatherproof ratings (IP44 minimum for partially sheltered outdoor areas) will fail prematurely and present an electrocution risk when wet.
- Wiring exposed to UV or physical damage: conduit or cable runs that are not properly protected will degrade from UV exposure and can be damaged by impact or animals.
- Absence of RCD protection: any outdoor circuit in a carport should be protected by a residual current device (RCD/GFCI). Many older installations lack this protection.
- Undersized circuits for EV charging: a standard 10-amp household outlet is not suitable for regular overnight EV charging. A dedicated 32-amp circuit is typically required for a Level 2 home charging unit.
All electrical work in a carport must be carried out by a licensed electrician and, in most jurisdictions, will require an electrical compliance certificate. This is not an area where cost-cutting is advisable.
Planning, Permit, and Boundary Compliance Problems
Not all carport problems are physical. A significant number of carport owners discover — often when selling their property or after a dispute with a neighbour — that their carport was built without the correct planning approval, in the wrong location, or to a design that does not comply with local building codes.
Common Compliance Issues
- Setback violations: most councils require carports to be set back a minimum distance from property boundaries — typically 1 metre from side boundaries and 4.5 to 6 metres from the front boundary. Carports built right to the boundary are frequently non-compliant.
- Height restrictions: carports in residential zones usually have a maximum height of 3 metres to the ridge. Gabled carports can easily exceed this if the pitch is steep.
- Site coverage limits: the total area of structures on a residential block is usually capped as a percentage of total lot area (often 50% to 60%). A large carport addition can push a property over this limit.
- Heritage or covenant restrictions: properties in heritage overlays or subject to restrictive covenants may have additional constraints on the size, materials, or appearance of carport structures.
If a carport was built without approval and does not comply with current regulations, options include applying retrospectively for a building permit (possible if the structure meets current standards), modifying the structure to achieve compliance, or in the worst case, demolishing and rebuilding. Always check your local council's planning requirements before starting any carport project.
Maintenance Schedule to Prevent Carport Problems
Most carport problems are preventable or can be caught early enough to be inexpensive if a consistent maintenance schedule is followed. The table below outlines a practical maintenance routine for both metal and timber carports.
| Frequency | Task | Applies To |
|---|---|---|
| Monthly | Wash down frame and roof with mild detergent and water | Metal and timber |
| Every 3 months | Check and clear gutters and downpipes | All carports with gutters |
| Every 6 months | Inspect posts for rust, rot, or impact damage; check plumb | Metal and timber |
| Every 6 months | Check roof fasteners and reseal any that show deterioration | Metal carports |
| Annually | Inspect timber members for rot and borers; treat if needed | Timber carports |
| Annually | Check slab for new cracking and reseal existing cracks | All carports |
| Every 3–5 years | Repaint or apply fresh topcoat to timber; touch up metal coating | Metal and timber |
| After any major storm | Full structural check: roof fasteners, post plumb, connections | All carports |
The cost of this routine maintenance is minimal — mostly your time and basic materials. The cost of ignoring it and allowing problems to escalate is measured in thousands of dollars or, in the worst case, in the total replacement of the structure. A carport that is checked and maintained consistently will reliably outlast one of identical quality that is never inspected.

 浙公网安备 33068302000509号